

I was at the client-side last week for user training and the users were suggesting me with a Wiki Site Management feature. I was like, all your wiki links is going to stay at the left navigation for sure, but what more could we do to make it more appealing? I happened to look at my start button and saw the tiles and I was like “wow” I think I got an idea! So, I told the users about it and they said yes to it! Let us show you on how to arrange Wiki Pages with tile view.
This is going to be easy and no coding required! Yes, I said no coding required! All you need to do is create some fancy metro tile icons on PowerPoint or any other solutions. Let’s get to this in detail.
P.S. Heads-up! This is not going to be responsive and as mentioned about, this is aimed to assist the end users without any coding efforts. Get in touch with your UI developer to help develop a responsive design.
#1. Design your desired buttons and background images for the Wiki Page Tiles.
Not everyone is a designer! I personally use Adobe Photoshop or Illustrator to work on graphics. For starters, you may checkout www.canva.com or www.snappa.com to come up with great button designs. If you are not comfortable in using editing websites, choose our very own Microsoft Office PowerPoint.
Work on the designs and make sure to check the padding allowed in the tables. Press F12 and find select element by click (in the web browser). Select the cell in the table and find the padding reference.
Choose a landscape image of at least 1024x768 resolution. Once the buttons and background image are ready, let’s get into the actual configuration.
#2. Create a new page in Microsoft SharePoint
Go to Settings (Gear Button), select Site Contents, search for Pages. Click on Add Page. Give it a name and save.
#3. Adding the background image to the newly created page
Go to the newly created page.
- Select Edit page (Make sure you are an admin or a user with site edit permissions, check with your SharePoint Admin/IT Manager regarding this).
- Go to Insert Tab -> Add web part -> Media and content -> Script Editor
- Edit Script Editor web part and insert the code as given below
<style>
body {
background-image:url("/sites/dev/PublishingImages/Pages/Wiki-Metro/p_1000762494.jpg") ! Important;
}
.ms-core-overlay {
background-color: transparent;
}
</style>
#4. Adding a table with the tiles
- Save the page to make sure that the background image is showing up properly.
- Now, edit the page again, click on Insert Tab, and add a new table with 4Wx4H (You can keep adding rows and columns based on your need).
- Go ahead and add the tiles that you had created earlier. Depending on the size of the images, you might need to merge some cells.
- Add hyperlinks to these images by clicking on insert tab, link -> from address.
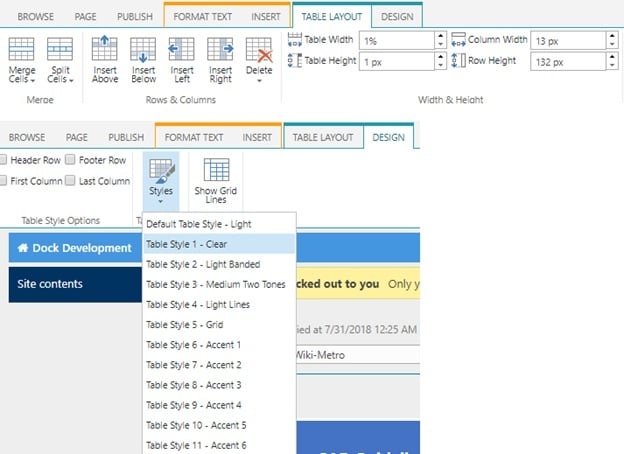
- Set table width to 1% and table height to 1 px. This is to ensure that the images doesn’t move because of the resolution or by zooming into the page.
- If images move out of line, make sure to take out the spaces before or after inserting images.
Finally, remove the table border. Select Design Tab -> Style and select Table Style 1 – Clear.
Tadaa! A simple Tile Page for my wiki sites. Cool Isn’t it?